The Western Instruments N88-12 Reference Pit Depth Gauge, 5.5" Blade is a precision instrument that allows the Corrosion Inspector to conveniently measure Pit Depth or material loss in areas of Weight-Loss Corrosion. The Western Instruments N88-12 Reference Pit Gauge has a 5.5 inches (140mm) long x 0.75 inch wide blade with an inverted V wedge and 2 adjustable magnet cartridges. Western Instruments Pit Gauges assure compliance with vessel, pipeline, tank and OCTG specifications for corrosion and erosion depth measurement.
Western indicators are specifically designed for use as a Pit Gauges. Our Pit Gauges are not adapted Depth Gauges
Indicators are available in Inch or Metric Dial Indicators and Digital Indicators
The indicator measures from 0 to 0.500 in 0.001" increments, and is fitted with our versatile contact point that is easily replaced
Contact Points: Western offers a variety of Contact Points, which are all 0.625" (16mm) long. Any ADG Contact point can be used with our special indicators, but a different length may affect Height Zeroing, or the vertical position of the indicator. Contact points are easily replaced by extending the Contact Point, and turning it counter clockwise
Scanning: Westerns indicators have the special Push to Read feature that ensures the contact point is retracted and protected by the blade. Push to Read allows the operator to scan through a Pit to obtain an idea of the shape
Indicator Positioning: The position (or rotation) of the indicator can be changed by simply loosening the Clamp Fastenes or Set Screw, and rotate the indicator about the blade. After the indicator is rotated, the unit should be zeroed
Height Zeroing: Loosen the Fastener(s) holding the Indicator in place. Hold the Blade firmly on a Flat Surface, and gently press the body of the Indicator down until the contact point touches the flat surface. Carefully re-tighten the Clamp Fastener(s) or the Set Screw. Any fine zeroing can be done by rotating the Bezel Scale on the Indicator. Height Zeroing should be done whenever the unit is put into use. Be sure that the contact point does not lift the blade off surface
Zeroing Dial Indicators: The vertical position of the Contact Point, needs to be Zeroed with respect to the Knife Edge of the Blade. Zeroing can be accomplished in two ways; by adjusting the Height of the Dial Indicator in the Blade; or by Rotating the outer Bezel Scale while pressing on the Plunger onto a flat surface
Scale Zeroing: To quickly check the Zero Point of the Dial indicator, place the Blade on a representative smooth surface. Gently press the Plunger, until the contact point touches the surface. While the contact point is on the surface, loosen the Bezel Lock, and rotate the Bezel Scale until it reads '0' with respect to the pointer
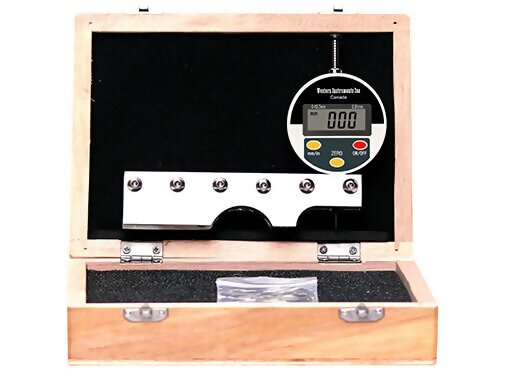
This Kit consists of a Pit Gauge, carrying case, standard (N88-S) contact tip, conical (N88-C) contact tip, Allen wrench (for adjustment), Operator Instructions and Calibration Certificate
This Kit consists of a Pit Gauge, carrying case, standard (N88-S) contact tip, conical (N88-C) contact tip, Allen wrench (for adjustment), Operator Instructions and Calibration Certificate
Product Features
Western indicators are specifically designed for use as a Pit Gauges. Our Pit Gauges are not adapted Depth Gauges
Indicators are available in Inch or Metric Dial Indicators and Digital Indicators
The indicator measures from 0 to 0.500 in 0.001" increments, and is fitted with our versatile contact point that is easily replaced
Contact Points: Western offers a variety of Contact Points, which are all 0.625" (16mm) long. Any ADG Contact point can be used with our special indicators, but a different length may affect Height Zeroing, or the vertical position of the indicator. Contact points are easily replaced by extending the Contact Point, and turning it counter clockwise
Scanning: Westerns indicators have the special Push to Read feature that ensures the contact point is retracted and protected by the blade. Push to Read allows the operator to scan through a Pit to obtain an idea of the shape
Indicator Positioning: The position (or rotation) of the indicator can be changed by simply loosening the Clamp Fastenes or Set Screw, and rotate the indicator about the blade. After the indicator is rotated, the unit should be zeroed
Height Zeroing: Loosen the Fastener(s) holding the Indicator in place. Hold the Blade firmly on a Flat Surface, and gently press the body of the Indicator down until the contact point touches the flat surface. Carefully re-tighten the Clamp Fastener(s) or the Set Screw. Any fine zeroing can be done by rotating the Bezel Scale on the Indicator. Height Zeroing should be done whenever the unit is put into use. Be sure that the contact point does not lift the blade off surface
Zeroing Dial Indicators: The vertical position of the Contact Point, needs to be Zeroed with respect to the Knife Edge of the Blade. Zeroing can be accomplished in two ways; by adjusting the Height of the Dial Indicator in the Blade; or by Rotating the outer Bezel Scale while pressing on the Plunger onto a flat surface
Scale Zeroing: To quickly check the Zero Point of the Dial indicator, place the Blade on a representative smooth surface. Gently press the Plunger, until the contact point touches the surface. While the contact point is on the surface, loosen the Bezel Lock, and rotate the Bezel Scale until it reads '0' with respect to the pointer